No – we are all about perfection of ratings. There are other great solutions for comments/reviews. Here are some of them: DISQUSS, LiveFyre, Yotpo.
Results
-
Do you support text reviews?
-
Does the RatingWidget allows user to leave a comment with the rating?
At RatingWidget we focus on ratings. That’s where we excel and focus at. We do not support commenting. If you like to add comments to your site, there are plenty of great solutions for that. For example: DISQUS, Facebook Comments, Livefyre.
-
My homepage not showing any ratings, what’s wrong?
Make sure your Front Page ratings are enabled for excerpts. In addition, your theme’s front page template must use the_excerpt() or the_content() methods to show/load the excerpts. We use this method’s hook to add the rating code. You can either try to fix that, or you can add our PHP shortcodes directly to your theme’s front page template.
-
Can I get RatingWidget to work within Google Sites environment?
By default Google Site’s do NOT supports 3rd party scripts therefore copying RatingWidget’s JavaScript code won’t work.
BUT, we’ve found a workaround to make RatingWidget work with the help of Google Gadgets.- Download the Rating-Widget Xml Gadget template file from:
- Go to:
http://rating-widget.com/get/rating/ - Customize your ratings’ style and language.
- Copy the RatingWidget JavaScript block code and place it right after:
<!-- JavaScript Code - BEGIN -->
- If you plan to add multiple ratings, modify
data-uridattribute to your unique rating identifier (replace my rating 1 with any alphanumeric string):<div class="rw-ui-container" data-urid="my rating 1"></div>
- Save the Xml file and upload it to your hosting server.
- Finally, in your Google Site, click:
Edit page ► Insert ► More gadgets ► Add gadget by URL ► paste the gadget URL ► Add. - Done! Your RatingWidget for Google Site is ready for visitors voting.
Important Message: As part of Google’s act to turn the web into more secure, since August 6, 2014 all Google Sites are only working over HTTPS. RatingWidget does support HTTPS, but only starting from the Professional Plan. Therefore, after your 7 days of your free Business Plan trial, you’ll have to upgrade to Professional.
-
Does your rating widget work with GoDaddy’s website builder?
Currently it’s impossible to add RatingWidget using GoDaddy’s website builder due to it’s very limited capabilities. We might work something out in the future.
-
How to hide the ratings from Blogger pages? I only want to keep them on posts.
Open your Blogger’s template editor. There, search for ratingwidget in the code.
Replace the following code:
<b:includable id=’main’><data:content/></b:includable>
With the following code wrapped with the required page type criteria:
<b:includable id='main'><b:if cond='data:blog.pageType != "static_page"'><data:content/></b:if></b:includable>
-
Will RatingWidget slow down my site?
No, not if installed correctly. If site speed is a big concern and you’ve got other essential JavaScripts loading, just place Rating-Widget right before the closing body tag </body> It doesn’t care if it’s last in line, and this way it won’t slow you down.
-
How RatingWidget can boost my Shopify store income?
It’s all about Social Proof, that’s the name of the game! Here are some studies that explains how the ratings can increase your products conversion rates:
- According to Google, 70% of Americans now say they look at product reviews before making a purchase.
- A CompUSA and iPerceptions study revealed that 63% of consumers indicate they are more likely to purchase from a site if it has product ratings and reviews.
- According to Harvard Business Review research, a 1-star increase in Yelp rating leads to 5-9% growth in sales.
Furthermore, once your SERP will include the ratings and your search incoming traffic will increase – your store will get more leads which means more potential customers.
-
How to configure my server for RatingWidget?
You don’t! RatingWidget is a SaaS solution. The widgets are hosted by us, meaning all stars & thumbs ratings data is automatically managed on our servers.
-
The WordPress plugin don’t work, where are my ratings?
Don’t panic – you are not alone! Your custom theme’s developer forgot to call
wp_footer()in the footer template file (usually named footer.php). Our star ratings core JavasSript is loaded on this action hook. Once this fixed the ratings should appear.More info here - http://codex.wordpress.org/Theme_Development#Plugin_API_Hooks
-
The RatingWidget WordPress plugin don’t show ratings on my comments, what’s wrong?
First, make sure you’ve enabled the ratings for comments in your admin’s dashboard. Once you sure it’s enabled, but still doesn’t work, a common cause can be that your theme isn’t using
comment_text()to display the comments text. A common mistake by theme developers is the use ofget_comment_text()instead ofcomment_text(). Try to switch between those and it should fix the issue. If you are awesome, contact the theme developer and let him know about the issue so he can fix it for everyone else. -
How can I stop the paid subscription?
We’re very sorry to hear that you’ve decided to cancel your pro program. Probably we did something wrong. We would very appreciate if you could share the honest reason you are cancelling the profile via [email protected] so we could improve our service for future customers (you can be real, we won’t get offended). Thanks!
Quick Cancellation Instructions:
To cancel the subscription simply login to your PayPal account and open the recurring payments page. There, select the relevant recurring payment profile and cancel it. -
How can I remove the thumbs ratings from my Blogger comments?
If you would like to deactivate the comments ratings, simply go to your Blogger’s Layout page and click on the Edit link just below the RatingWidget Gadget. Then, add the following JavaScript line:window._rwscHide = true;
Just before:
window._rws = window._rws || [{ -
Can I add a rating inside my WordPress post’s content?
We created a special shortcode you can use inside your posts / pages editor.
For post ratings:
- Current post rating -
[ratingwidget] - Specified post rating -
[ratingwidget post_id=123]
For page ratings:
- Current page rating -
[ratingwidget type="page"] - Specified page rating -
[ratingwidget type="page" post_id=123]
For random ratings (not bound to any page/post):
- Rating -
[ratingwidget_raw id="1" title="my-title" type="page"]
Rich-Snippets support:
If you are using our Professional or Business plan which supports Rich-Snippets integration, and you want that the rendered rating will have the relevant schema, please add theadd_schema=trueattribute to the shortcode. For example:
[ratingwidget post_id=123 add_schema=true]Note: If you already have a rating with schema.org on the same page, adding additional rating with schema.org metadata will confuse search engines, and will cause your ratings disappear from SERP.
- Current post rating -
-
Is there any PHP shortcodes I can use for my custom posts templates?
We created several custom PHP shortcodes to make it easy for you adding RatingWidget into your custom templates or even if you want to customize the exact location of the ratings in your pages.
Here are the shortcodes:
- Output post / page / comment rating:
function rw_the_post_rating($postID = false, $class = 'blog-post', $schema = false);
- Return post / page / comment rating:
function rw_get_post_rating($postID = false, $class = 'blog-post', $schema = false);
- Output user rating:
function rw_the_user_rating($userID = false);
- Return user rating:
function rw_get_user_rating($userID = false);
Usage example:
<?php rw_the_post_rating(14, 'front-post'); ?>
Params:
$postID– The post id. Defaults to current’s loop post id.$class- Rating class/type. For front page posts use ‘front-post’, for posts use ‘blog-post’, for pages user ‘page’, for comments use ‘comment’.$schema- If TRUE, add Rich-Snippets schema.org metadata (only for Professional customers).$userID- User ID. Defaults to current’s loop user.
You can find the shortcodes implementation in /rating-widget/lib/rw-shortcodes.php
- Output post / page / comment rating:
-
When someone voted a rating, can he ever vote it again?
By default, every visitor can rate each rating ONCE. This voting frequency is configurable and could be changed to:
UNLIMITED: Visitor can contribute as many votes as he likes.
DAILY: Visitor can rate once in every 24 hours.
WEEKLY: Visitor can rate only once in every 7 days.
MONTHLY: Visitor can rate once in every 30 days.
YEARLY: Visitor can rate once in every 365 days.
You can read more about the frequency configuration in our documentation.
-
How do you identify the visitor / voter?
In order to prevent from multiple votes from the same visitor (check out the topic about voting frequency here), our default identification technique is cookies. We leverage both regular HTTP cookie and LSO (Local shared object a.k.a Flash Cookie) to uniquely mark the visitor’s device. As you probably figured out, it’s very simple to clean your cookies or use incognito mode, to actually make more than one vote from the same device. Thus, if fraud votes is a critical issue for you, our premium product support additional identification methods:
- By IP: These visitor identification method means that by default only one vote can be contributed from the IP. The advantage of this method is that it’s much harder to change IPs than cookies (requires some hacking skills but possible using proxies, etc.). The disadvantage is that different visitors who are using the same NAT (E.g. same router device), won’t be able to vote more than once.
- By Login: We provide a very useful JavaScript callback called beforeRate, you can use it to force a login to your site before being able to rate. Note: These method is also not 100% safe and could be hacked.
- By Social Login: Before a visitor can rate, he is required to connect his social identify with RatingWidget (currently we’ve implemented Facebook Connect). We believe this is the most safe identification method for many reasons. The main one is that in order to make fraud/fake vote – it requires a new social identity (creating of social identity takes time, requires unique email, etc.). The disadvantage of this method is that it significantly reduces the number of votes (some people don’t like to connect their social identity with external services).
-
Can I contribute my own stars design so you can upload it for everyone?
Hell Yeah! It’s always awesome that our community contribute designs. Because of cool people like you we have the largest ratings themes collection on the web! Before you send it to provision at [email protected], please make sure the design is built correctly with the help of this page:
http://rating-widget.com/contribute-rating-design/We are looking forward to see your design!
-
Do you have a refresh code for Ajax loaded content?
In order to refresh / re-render the ratings on the page all you need to do is execute the following JavaScript line.
RW.render(null, true);
You can add the following code snippet right before your closing </body> tag (requires jQuery support) and it will automatically do the job.
<script type="text/javascript">
    (function($){
        $(document).ajaxSuccess(function() {
            setTimeout(function(){
                if ("undefined" !== typeof(RW))
                    RW.render(null, true);
            }, 500);
        });
    })(jQuery);
</script>
If you care about efficiency, call this method only after you add new ratings’ HTML containers (not on every Ajax call).
Using the WordPress Plugin?
To add the snippet right in your WordPress’ footer, add the following code to your theme’s functions.php file:
/* Append ratings render-er after ajax call. ------------------------------------------*/ function rw_render_ratings_after_ajax() { ?> <script type="text/javascript"> (function($){ $(document).ajaxSuccess(function() { setTimeout(function(){ if ("undefined" !== typeof(RW)) RW.render(null, true); }, 500); }); })(jQuery); </script> <?php } add_action('wp_footer', 'rw_render_ratings_after_ajax'); -
Does RatingWidget WordPress plugin works with multisite network?
Yes it is! The RatingWidget WordPress extension plays well with WordPress multisite networks. Just note, that if your network is using multiple domains and you would like to upgrade to one of the paid plans, you’ll have to use a separate license for every domain.
-
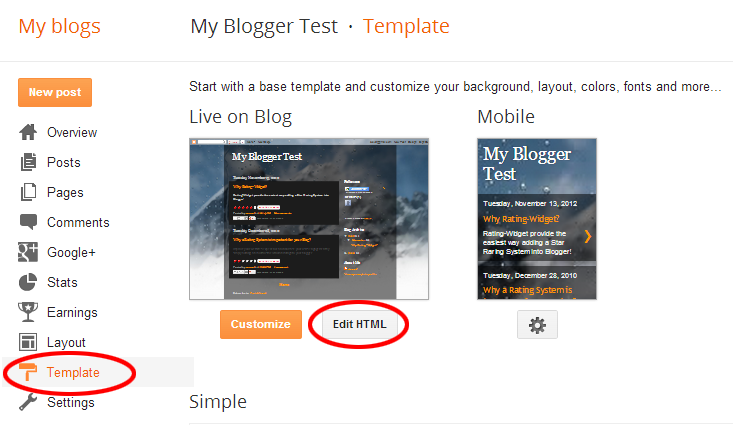
How to enable RatingWidget Gadget for Blogger’s Mobile Template?
- Inside blogger window, under “Live on Blog”, choose Template and click Edit HTML.
- Click inside the text area and search for RatingWidget widget you’ve just added by pressing CTRL–F (Or Commad-F on OSX) and typing RatingWidget. You should see something similar to the following line:
<b:widget id='HTML1' locked='false' title='RatingWidget' type='HTML'>
Your element’s id attribute might be a little different (e.g. id=’HTML2′).
- Add mobile=’yes’ to enable RatingWidget on your mobile template. The new line should look like this:
<b:widget id='HTML1' mobile='yes' locked='false' title='RatingWidget' type='HTML'>
- Click Save Template and the ratings should now work on your mobile view.
-
How to customize the positioning of the ratings on Blogger with RatingWidget for Blogger Gadget?
-
-
by RatingWidget
- Open your Blogger’s template editor.
- Locate the HTML position where you’d like to position the ratings.
- Add the following anchor element:
<b class="rw-rating-container"></b>
- Done! Watch how the magic happens.
-
I have added RatingWidget for Blogger Gadget but I can’t see any ratings, what’s wrong and how can I fix it?
-
-
by RatingWidget
RatingWidget has to assign a unique ID to every post’s/page’s rating. The assigned ID is the Blogger’s post ID. Therefore, if the RatingWidget for Blogger script can’t find any ID, the ratings won’t appear on the page.
Below you can find a short instructions that will help you to check if your Blogger’s template contains the post-ID HTML element. If not you’ll be guided to add the right element to resolve it.
- Open your blog’s template and click on EditHtml:
- In order to find the main post template container, put the mouse cursor anywhere inside the code area and click Ctrl+F to start the search functionality.

- Search for the following code:
<b:includable id='post' var='post'>
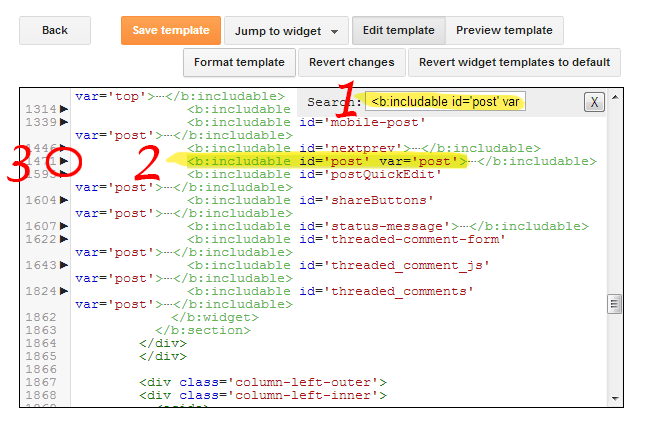
- Then, expand the sub-template by clicking the small arrow next to the line number on its left and search for the following meta element:
<meta expr:content='data:post.id' itemprop='postId'/>
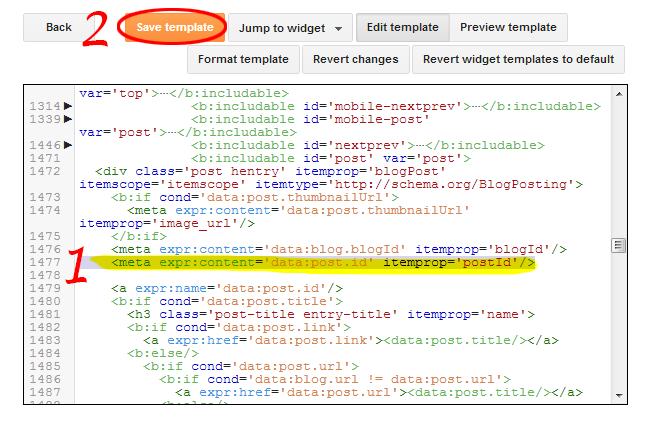
- This meta tag is required in order to match each rating with its corresponding unique post ID, so if you can’t find it, simply add it and save the template.Hint: In many theme’s you can search for:
<a expr:name='data:post.id'/>
and simply add the meta element afterwards.
-
The ratings doesn’t seem to work on old browsers like IE7 and IE8 (internet explorer), how to fix it?
RatingWidget’s core ratings script is supported on all modern browsers like Chrome, FireFox 3.0 and Higher, Safari, Opera and Internet Explore 7.0 and Higher.
But in order to make sure the ratings will work correctly on IE7, IE8 & IE9, please verify your HTML’s DOCTYPE declaration is set to XHTML 1.0 Strict. This directive instructs the browser to use the correct version of HTML RatingWidget should be render with.
If you already have a DOCTYPE declaration at your HTML document, simply replace it with:
<!DOCTYPE html PUBLIC "-//W3C//DTD XHTML 1.0 Strict//EN" "http://www.w3.org/TR/xhtml1/DTD/xhtml1-strict.dtd">
If you don’t have any DOCTYPE in your document, just add it before the <html> tag.
-
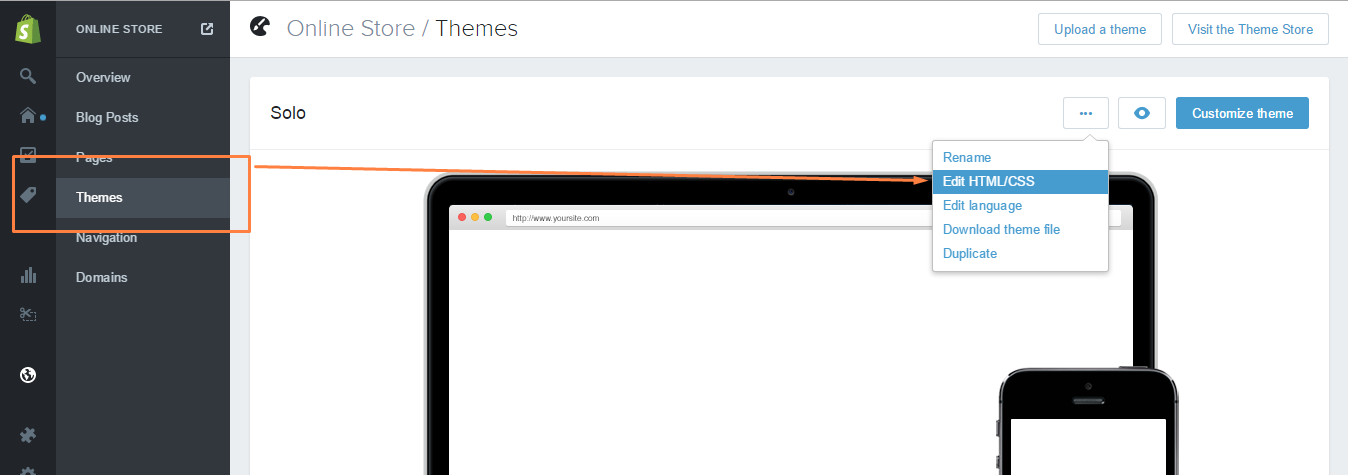
How to show the ratings in Shopify Product Collection pages?
By default, RatingWidget for Shopify app will show the ratings only on Product Pages. With some minor tweaks in you theme’s template, you can easily add the ratings to your Product Collections.
- Open Shopify’s admin dashboard and go to Themes. There, click Edit HTML/CSS to open the template editor:
- In your editor, expand the Snippets directory and select
rw-js.liquid.
Now, simply change the first line of code:{% if template contains 'product' %}to this code:
{% if template contains 'product' or template contains 'collection' %}This will load the ratings on product and products collection pages.
- Now, to embed RatingWidget to your Collection pages, find the liquid file that is responsible for the collection template (the template file may have different names depending on the theme you are using, but usually it’s named
collection.liquid). There, add the following ratings snippet exactly where you want the ratings to appear:{% include 'rw-rating' %}
Wasn’t that simple?! If you have no clue about coding or liquid files modification, feel free to contact us. Our Shopify experts would be happy to do it for you for a symbolic setup fee.
- Open Shopify’s admin dashboard and go to Themes. There, click Edit HTML/CSS to open the template editor:
-
How to disable product voting for NON logged customers?
If you want someone to log into their Shopify account before they can rate your products, simply follow these steps:
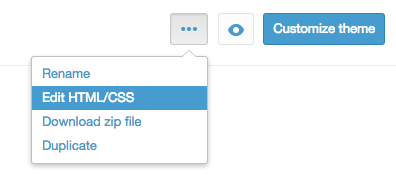
- Log into your store’s Management Dashboard and open your Template’s Editor:
Themes -> Customize theme -> Edit HTML/CSS. - There, find
Snippets/rw-settings-custom.liquidand click it. - Add the following code:
{% if customer %}{% else %} settings.options.readOnly = true; {% endif %} - Now Save the file and you done

If you have no clue about coding or liquid files modification, feel free to contact us. Our Shopify experts would be happy to do it for you for a symbolic setup fee.
- Log into your store’s Management Dashboard and open your Template’s Editor:
-
I uninstalled RatingWidget for Shopify app but the ratings are still on my product pages. How to completely remove the ratings?
1. Go to your Store Admin Dashboard.
2. There, click Online Store menu, then click Themes, then click on Edit HTML/CSS.
3. Open Layout/theme.liquid, search for
{% include 'rw-js' %}and remove it. It can usually be found immediately before the</body>tag.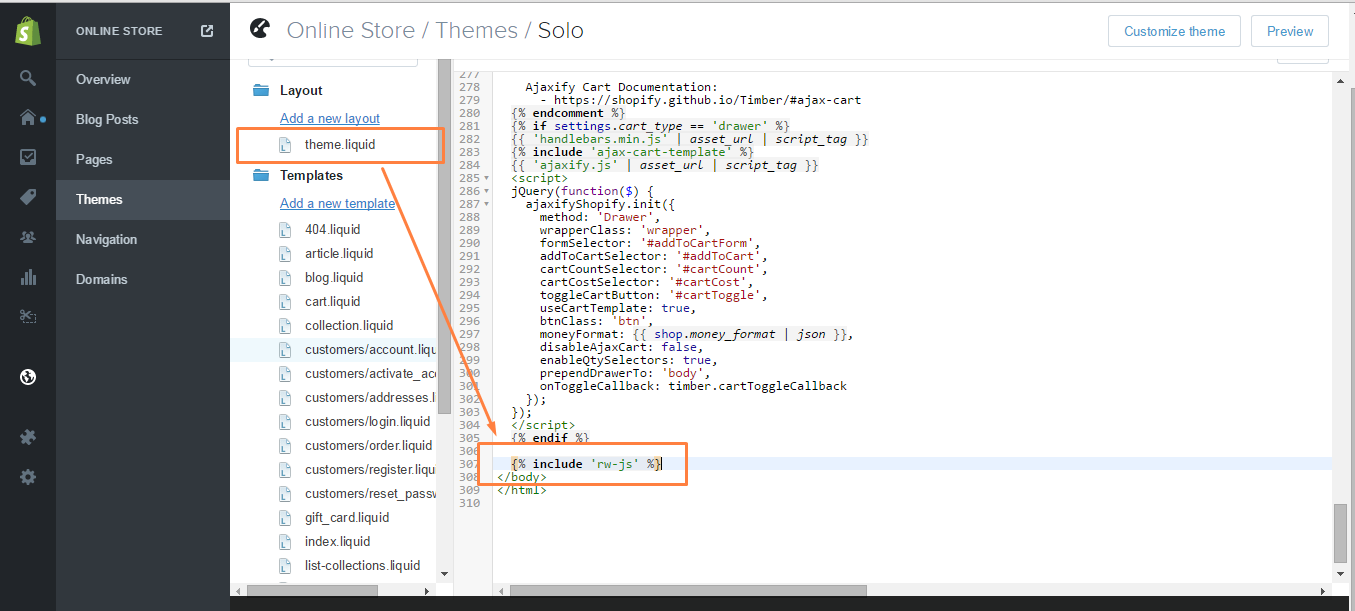
4. Save the changes.
-
I just upgraded RatingWidget for WordPress plugin to Professional. What do I need to do to activate the Rich-Snippets?
Rich Snippet is automatically activated after the upgrade. The markup will be added automatically to your posts and pages once they receive at least one vote. All you need to do is to test the markup by following these simple steps:
- Go to your WP Admin Dashboard -> RatingWidget -> Account and make sure your license is Professional or Business. If not, please click the Sync License button.
- Then, vote any of your posts or pages.
- Purge the cache if you have any caching plugins.
- Check the markup by following the instructions here: How can I check that I’ve correctly configured the Rich-Snippets ratings for Google SERP?
-
How to hide the content recommendations shown in the after vote report popup?
-
-
by RatingWidget
To disable recommendations shown in the report popup, simply add this code snippet
"hideRecommendations": true,
to your existing integration code options. Your new integration code should be something like:
    ...
    options: {
       "hideRecommendations": true,
       "size": "medium",
       "style": "oxygen",
    }
    ...
WordPress Plugin User?
- Go to Dashboard > RatingWidget
- Select the rating type tab you’d like to modify
- Scroll to the bottom of the setting page until you get to the Power User Settings
- Check the Activate / in-activate checkbox to activate the Power User Settings.
- By default, the
hideRecommendationsoption will already be there as one of the examples:options.hideRecommendations = true;
- Delete all other preset functions if not needed or modify when necessary. Then click Save Changes and you’re all set!


